How to Stack It: The Best Firewood Stacking Methods
When the chill comes back into the air and the leaves start to show their true colors, those of us who heat with wood start itching to “get the wood in” and prepare for the long winter. As the old saying goes, wood warms you three times: when you split it, when you stack it, and when you burn it. Although, if you’re using your trusty DR RapidFire or Dual-Action log splitter, the splitting step might just be the easiest of the three!
Firewood stacking is an age-old art, and for many of us, a pain in the age-old tuckus. When you choose a method and location for your wood pile, there are two important goals to keep in mind:
- Keep the wood dry.
- Ensure that the wood will continue to dry even more.
 Traditional Towers
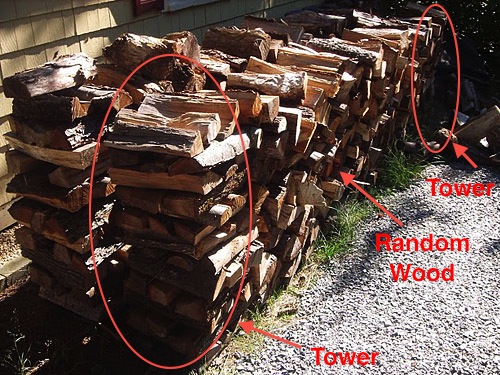
One of the most common ways to stack firewood is in a traditional tower arrangement — two towers of perpendicularly-placed logs with randomly-placed logs stacked in between. The trick here is making stable end towers. You can try to make them stable on their own by choosing logs that naturally fit together, or use shims to prop them into place. Some people prefer not to use shims because they feel that logs that fit together naturally will be more stable. This is a personal preference though. Those who stack using this method take a great deal of pride in building stable end towers that won’t succumb to the elements halfway through the winter.
 The Round Stack
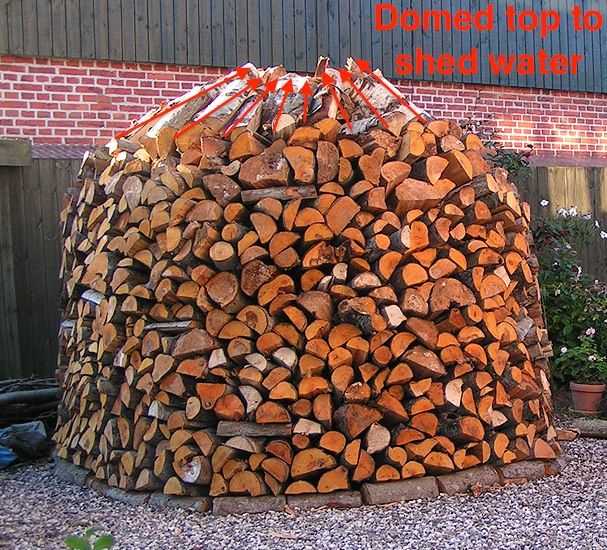
This one might turn some heads. Wood stackers in Scandinavia have been using round wood piles for centuries with much success. Round stacks are easier to build, more stable, and shed water better than traditional towers — if you do them right. Start by stacking logs in a circle, using a 4-foot long rope looped around a stake stuck in the middle of your pile to make sure it is a perfect circle. Leave a circle of empty space in the middle.
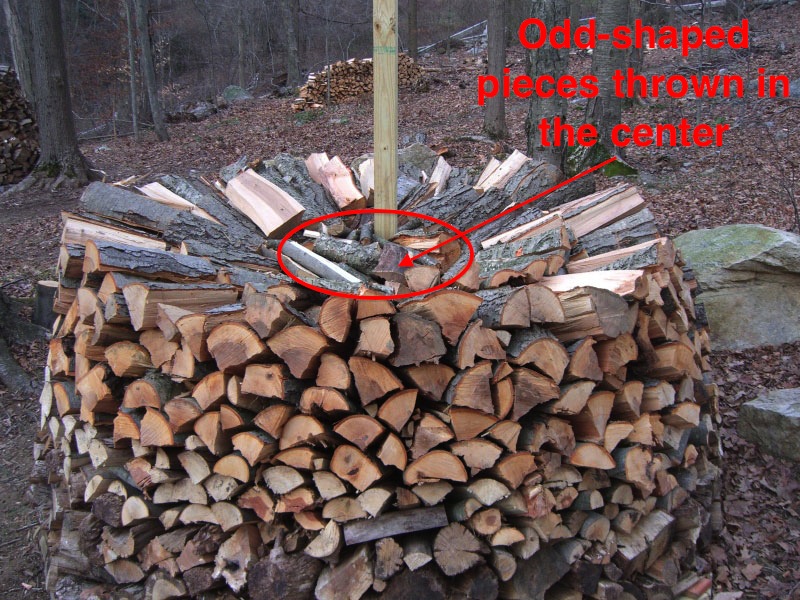
As you build up, you’ll notice that the logs will touch more in the middle and have larger spaces between them on the outside. Because of this, you’ll have to take care to make sure the layers tilt slightly inward. This can be tough, and logs that are smaller at one end than the other work best. Fill the center space with the really oddly-shaped wood pieces you’ve got — they can be thrown in randomly. Once your stack is about 4 feet high, build your logs into a cone shape that will shed water easily. To finish it off, build a “roof” of either shingles, longer wooden poles radiating out from the center, or black plastic.
This method is great for all your oddest-shaped logs. Some people like to use it as a companion to traditional tower piles for just that reason. And it is usually easier and faster to build, which doesn’t hurt at all.
Regardless of your method . . .
Regardless of the stacking method you choose, keep in mind the base on which you build your wood pile and the covering that you place over it. Building your pile on a concrete or wooden base (such as a wood pallet) will help prevent bottom rot, which can render much of your wood unusable.
There are strong opinions on both sides of the ‘to cover or not to cover’ argument. Some people never cover their wood piles, while others wouldn’t dare leave it uncovered. Some leave it open in the summer months and then cover with black plastic or sheet metal when winter hits. If you do cover, most experts agree that the cover should somehow hover above the pile, not be directly on top of it. This keeps the rain and snow off, but still allows the sun in to keep the wood drying. Keep in mind that the ideal covering will likely depend on your climate and location, so I’d ask around and see what your neighbors do if you’re new to heating with wood.
Want to learn more about DR Log Splitters?
Order your FREE Buyer's Guide & DVD!

What's inside
- 24-Page Buyer's Guide
- Action-Packed DVD
- Money-Saving Promotions